There are a number of things that can damage your roof. Some can be prevented by regular inspections and quick Roof Repair.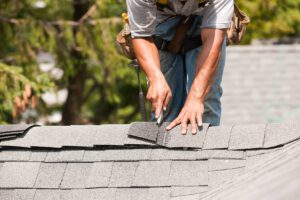
For example, a simple leak left unattended can cause water damage throughout the house. The faster you get the issue addressed, the less likely you are to have a major problem later on.
One of the most common roof repair issues is a missing or damaged shingle. Replacing a single shingle can be a fairly simple task for a homeowner with a little experience, but addressing a full section of damage will likely require more advanced roof repair skills. Before attempting a roof repair, make sure you have the right tools and a plan in place. It’s also a good idea to wear a tool belt while working on your roof, which will keep small tools within reach and prevent them from falling down the gutters or onto your head.
The first step in repairing a damaged shingle is to locate the nail holding it in place. The best way to do this is by examining the area around the damaged shingle. Look for a black spot near the damaged shingle that looks weathered, discolored, or dirt-covered. This indicates that the shingle was exposed to severe wind for a long period of time.
Another sign of wind damage to shingles is a pattern of cracking or dislodging shingle strips. This can be a result of extreme wind exposure, or it could be the result of temperature changes causing shingle material to shrink and crack.
A third sign of wind damage is the presence of a shingle tab that appears to be lifted up from the shingle mat below. This can be a result of excessive nailing, poor-quality or defective shingles, or foot traffic on the roof.
If you notice any of these signs of roof damage, it’s important to get the issue addressed as soon as possible. Failure to do so can lead to leaks and other moisture problems inside your home.
Once you’ve spotted a damaged shingle, it’s time to start removing the nails that hold it in place. This can be a tricky process, but it’s necessary if you want to replace the damaged shingle. Begin by loosening the nails on the shingle above the damaged shingle with a pry bar and hammer claw. Once the shingle is loose, you can lift it and remove the nails with the hammer claw. Repeat this process on the shingles above and below the damaged shingle until all of the nails have been removed from the roof deck. Then, you can replace the damaged shingle with a new 3-tab shingle and nail it down with four roofing nails.
Leaking Gutters
Gutters and downspouts help redirect rainwater away from homes to prevent foundation problems, rotted fascia and soffits, damaged siding, and landscape erosion. However, gutters are susceptible to leaks and other problems that can cause serious damage. Fortunately, many of these issues can be prevented with regular inspections and small repairs.
Gutter seams, joints, and end caps can crack or separate due to the effects of weather and age. In most cases, these areas can be sealed with caulk or waterproof sealant. Silicone and butyl rubber sealants work best for gutter repair. Before sealing, clean the area with a plastic scouring pad or wire brush and flush it out with water to remove any rust.
When the gutters sag, they can no longer drain properly, and water may flow over or under them, causing paint and trim damage. You can usually tell when this is happening because you will see water running down the side of the house or puddles forming at the base of the walls.
If the sag is extreme, you may need to rehang the entire gutter section. In most cases, though, you can reposition the gutter hangers to eliminate the sag. To do this, get on a ladder and look down the gutter section to find the sag. Use a bubble level to check several spots along the gutter section and make sure there is a slight slope toward the downspouts at both ends.
Another gutter repair is to install gutter aprons. These are L-shaped lengths of metal that screw to the gutter and downspouts to eliminate gaps between the gutter and the wall and channel the water directly into the gutter. These are available at most hardware stores and cost less than $10 per section.
In addition to repairing leaks, you can also stop ice damming by installing an adhesive ice-and-water barrier where the roof meets the soffit. These products are available where roofing repair supplies are sold and can be worked in place like caulk, but they work better in cold climates and in wet conditions. They are much thicker than caulk, so they can be used on vertical surfaces as well as on sloped roofs.
Damaged Flashings
While they may not be as obvious as a missing or damaged shingle, damage to roof flashings can cause serious water leaks in the attic and other parts of the home. Flashing is made of thin metal pieces used during roof construction to connect the seams around installations such as chimneys, vents, and skylights. It also helps prevent water from entering these areas from the roof deck. Flashing is often made of copper, aluminum, or galvanized steel. While these are durable materials, they can become damaged through normal wear and tear or inclement weather.
If left unrepaired, damage to the flashing can lead to structural problems in the roof, including sagging or a collapsed roof. In addition, water that leaks through flashing can damage insulation and encourage mold and mildew to grow in the attic. If not addressed quickly, this can result in extensive roof repairs and costly repairs to your home.
Leaks caused by faulty flashing can be hard to notice, especially when the leak is confined to one or two small spots in the attic. However, if you notice stains on the ceiling or other signs of water penetration in your home, it’s important to contact KY-KO Roofing and schedule a roof inspection. It isn’t difficult for experienced roofing contractors to replace or repair damaged flashing. They can do so without disturbing the shingles on top of your roof.
Some common signs of flashing damage are raised shingles in the area and the appearance of rust or corroded spots on the metal. These spots can develop from exposure to the elements or even small animals. Cracks in the metal may break the galvanized coating and allow moisture to seep beneath the roofing shingles.
It’s also possible that caulking around the edges of windows or between corner boards and siding can be old, cracked, or missing. This allows water to dribble down the sides of the house and enter through the flashing into the attic and other interior rooms. Flashings can be replaced with new caulk to prevent water from leaking into your home.
Tree Branches
Tree branches play an important role in the overall health of a tree. They facilitate the flow of water and nutrients from the trunk to the leaves, flowers, and fruits. They also provide support and balance to the structure of the entire tree. A broken branch, however, can have an impact on the whole tree. Fortunately, there are several ways to repair tree branches and ensure that they stay healthy and strong.
The most common method of repairing a split tree branch involves using wood glue. It’s a simple process that only requires some basic tools and supplies. First, choose a branch that isn’t too damaged and is within reach from the ground. Next, remove any fruit or debris that is on the tree and make a clean pruning cut. Coat the entire surface of the split with wood glue, and then press it together firmly. Once it’s dry, it should be nearly impossible to detect the crack.
If you’re dealing with a large split, you may need to use cabling and bracing to support the branch while it heals. The area of the split bottlenecks the flow of water and nutrients from the rest of the tree, which can cause damage or death to the entire tree.
Cabling and bracing is a technique that uses rigid metal cabling or flexible synthetic cabling ropes to consolidate or reinforce the weak parts of a tree branch or trunk. It’s an effective alternative to cutting down a tree, particularly when the break is in a location that could damage buildings, trees, or other plants if it falls.
The best way to do this is by choosing a sucker, or “pluck,” from the base of the tree that’s about a half-inch thicker than the size of the split you’re attempting to repair. Create a flap in the bark, similar to that used in bridge grafting, and then slide the sucker under the split to form a girdle. Then tie the two sides of the split together with wire or twine, making sure that they’re held tightly.