Home » Posts tagged 'services'
Tag Archives: services
How Floor Refinishers Refinish Hardwood Floors
If your floors have wide, deep scratches or the top polyurethane layer is completely worn off, they may need refinishing. A floor refinisher will apply a new finish to protect the wood.
The finish can be a stain or varnish; varnishes leave no visible coat so do not change the color of the wood. Trowel filling is used to patch small gaps. This is not a permanent fix, as wood compresses during winter and expands during summer. Contact Floor Refinishers NJ now!
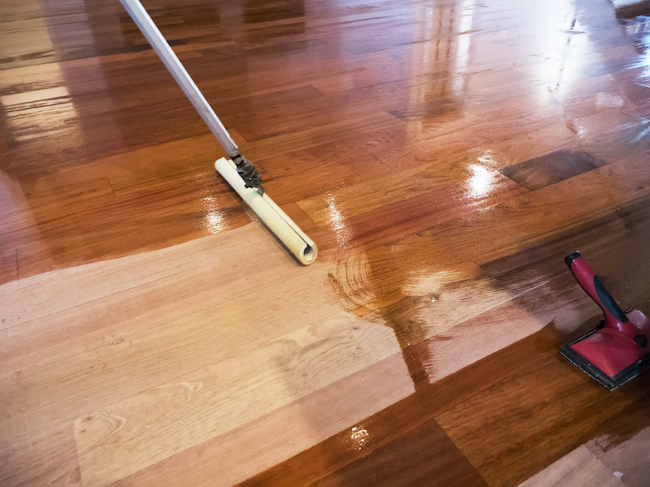
Before your floors can receive a new finish, they need to be sanded. This is an important step in refinishing hardwood floors, and it is also the most time-consuming part of the process. It requires a drum or belt sander, a dust mask and some elbow grease. Start with a coarse grit sandpaper to remove the old finish, and then move on to finer grits to smooth the wood. Make sure to sand in the direction of the grain to avoid uneven surfaces.
When sanding, it is best to remove all furniture from the room. This will allow for a more even sanding and help prevent damage to the edges of the boards. Also, it is a good idea to cover any vents and switches with plastic sheeting to prevent dust from blowing throughout the house.
It is recommended to use a drum sander when sanding the main area of the floor, and an edger for the corners. It is also a good idea to use a vacuum system that can suck up the dust as you go to minimize the amount of dust produced.
Once the sanding is complete, the floor must be thoroughly cleaned. It is important to get all the grit out of the grooves and crevices on the wood. This is especially important for engineered floors that have a very thin wear layer and can be easily damaged.
If you are going to stain your floor, it is a good idea to let the sanding settle for a few days before applying the stain. This will allow the stain to adhere properly to the sanded surface. It is also a good idea to apply several coats of the final finish, allowing each one to dry between applications.
The average cost for refinishing is $3 to $8 per square foot, depending on the type of finish you are using, the square footage of the floor and local labor costs. In addition, you will need to purchase a variety of supplies, including stain and varnish. It is a good idea to use low VOC stain and varnish for your floors, as these are less harmful to the environment.
Staining
The staining process is an important step that can make or break the overall look of your hardwood floors. Unlike finish, which is designed to protect your wood floor and adds only a clear color layer to it, stain actually colors the hardwood, enhancing or sometimes completely changing its appearance. Because of this, stain must be carefully matched to the color of your home and should be thoroughly stirred before applying.
It’s important that your refinisher use only quality stain products made specifically for hardwood floors. The best stains are oil-based and low in VOC (volatile organic compounds). They’re also tinted so that the final color can be adjusted. Your refinisher should also choose a high-quality brush or lambswool applicator. Generally, the stain will be applied in two-foot sections. After each section, the floor should be wiped down with a clean rag to remove any excess product. This will help the stain to set evenly.
Once the stain has dried, it’s time to apply a polyurethane varnish. Using a natural-bristle or lambswool brush, your refinisher will work in manageable sections to ensure even distribution of the finish. Your refinisher will then wipe down the surface to remove any residue and let the floor dry for a few hours before you walk on it again.
Lastly, your refinisher will apply three to four coats of polyurethane to protect and beautify your newly stained hardwood floors. This final protective layer is vital to the longevity of your floors. Your refinisher will then buff the finish with a special pad to smooth it and create a smooth, glassy surface.
Staining and finishing are processes that can be done by a skilled DIYer, but it’s best to have your floor professionally refinished by a professional flooring expert. Your floor refinisher will be experienced in working with power tools, and they’ll know how to best prep the hardwood for staining or finishing. They’ll also be able to provide you with a wide range of finish and stain options so that you can get the exact look you want for your floor.
Sealing
Before beginning the actual work of refinishing, a floor refinisher should ensure that all tools are in place and ready to use. Then he or she should wear protective eyewear, ear plugs and a respirator mask. The contractor should also put down painter’s tape and masking tape around the baseboards to prevent sanding dust from making its way up onto them. It is also important to remove any HVAC vent covers and to hammer down nail heads that protrude from the wood flooring’s finished surface.
Next, the hardwood floor must be cleaned with a residue free cleaner to remove any dirt and dust that may have accumulated in the cracks and crevices of the old finish. The floor is then scuff sanded lightly with 150-grit sandpaper to prepare it for the oil finish. The scuffing also helps to open up the bare wood to accept the oil. If the wood is extremely hard and case hardened, it can be treated with a specialized oxalic acid wood bleach to make it more responsive to the oil.
After scuff sanding and cleaning, the refinisher can begin the staining process. Whether the flooring is being stained for aesthetic reasons or as part of a repair job, the contractor should be sure to use a stain that matches the existing color of the floor. It is also important to let the stain dry thoroughly according to the manufacturer’s instructions.
The refinisher can then begin applying the new topcoat. He or she should apply a minimum of four coats to fully protect the floors. If the client opts for a water-based finish, the contractor should not have to sand the floor after every application, but it is still recommended that he or she sand between each one.
Polyurethane is the most common topcoat finish for wood floors, and it is available in a variety of sheen levels. It creates a clear, almost plastic-like layer that is durable and resistant to water and other stains.
It is also possible to have a wood floor sealed with a natural oil, such as pure tung oil. This option allows the wood to absorb the oil and protect it from moisture, but it will need to be reapplied more frequently than water-based finishes.
Finishing
If you’re not comfortable with sanding, a floor refinisher can apply a finish that will refresh your floors without sanding. Products like Rejuvenate Wood Floor Restorer have a thick consistency that will fill light scratches and soften dings in your hardwoods. The process is a bit time-consuming—especially if you’re refinishing more than 500 square feet of hardwoods—but it’s a less invasive option.
When you’re choosing a finish for your wood floors, make sure to choose a product that’s water-based. This type of polyurethane will dry faster, allowing your refinisher to complete the job more quickly. It also has fewer VOCs, which means that it won’t leave an unpleasant odor in your home. Additionally, a water-based polyurethane will look clearer on the surface of your floor (oil-based finishes have an amber tint) and resist further yellowing much better than an oil-based product.
Once your refinisher has finished applying the polyurethane to your hardwoods, it’s important that you let the floors dry thoroughly before moving any furniture back in place. Hardwood floors can emit strong fumes that linger in your home for hours, and it’s best to give them plenty of time to air out before you walk on them again.
It’s a good idea to ask your refinisher how many coats of polyurethane he or she intends to apply. While some refinishers will only apply two coats, three is a more appropriate option for most floors. Three coats will provide a deeper richness in color and increase the durability of your hardwood floors.
While refinishing your floors can be a major investment, it can add value to your home and last for a long time. Keep in mind, however, that your floors are not indestructible and will eventually need to be replaced. Some signs that it’s time to replace your hardwoods include mold or rot over the wood, extreme wear, or compromised integrity.
Refinishing or resurfacing your floors can make them look brand new again—and improve the quality of your home’s interior design. The key is to choose the right option for your needs and budget.
Choosing the Right Injector: Essential Tips for Safe and Stunning Lip Injections
The lips and eyes are arguably the most beautiful regions of the face. Enhancing these areas requires experience and expertise to achieve optimum results.
Lip Injections San Diego can help soften lines around the mouth by making the lips fuller, which tightens the skin. They can also correct asymmetry or add definition to the lips.
Filler Collections
 Lip fillers aren’t one-size-fits-all. Your dermatologist will help you decide what’s best for your aesthetic goals, whether that’s a little plumper fullness or reshaping your lips to a more natural shape. We use hyaluronic acid-based fillers, like Juvederm and Restylane, to achieve a wide range of looks. Our experienced care team is trained to create a look that’s totally unique to you, whether you want to look Instagram-influencer-ready or keep it lowkey and subtle.
The most important thing to remember is that you will likely experience some swelling after your treatment, and this is completely normal. We’ll provide you with tips to minimize discomfort, and we recommend avoiding painkillers that thin your blood (such as aspirin or ibuprofen) and taking hot showers or saunas the day of your appointment, as these can exacerbate swelling.
It’s also a good idea to avoid eating foods high in sodium, which can cause your lips to swell up and dilute the HA filler. You’ll also want to avoid kissing or putting pressure on your lips for up to 48 hours, as this can increase swelling and disperse the filler.
The lip is a highly vascularized area with a complex pattern of vessels and collaterals. The topography and distribution of these structures is highly variable, making the area more prone to complications during injections. The underlying connective tissue is also more sensitive to the effects of dermal fillers than the outermost skin layer.
Your dermatologist will choose a product that’s right for your specific needs and goals, based on the unique physiology of the region and its vasculature. Restylane is a great choice for soft, natural fullness and for smoothing vertical lines around the mouth, while Juvederm XC and Volbella are excellent options for filling in nasolabial folds or adding volume to the cheeks or jawline.
We also use the RHA Collection of resilient hyaluronic acid fillers, which offer impressive longevity. These products can last up to 15 months, which is longer than many other fillers on the market today. The RHA collections include RHA2, RHA3, and RHA4, which are formulated to work well in different parts of the face, so you can find a formula that’s ideal for your needs.
Natural-Looking Injections
Injectors who use a natural-looking approach to lip injections can create results that appear subtle, balanced, and harmonious with your face. They have a keen understanding of facial anatomy and detailed morphology to deliver precise enhancements that align perfectly with your vision.
One of the most common ways that lip fillers can look overdone is when a practitioner uses a cookie-cutter approach to each patient. It’s important to find an injector who has a good artistic eye. Word of mouth can help, but it’s also wise to ask for before and after photos so that you can see the practitioner’s work. Then, you can compare the images to a few pictures of a naturally shaped face to get an idea of what a beautiful result should look like.
A skilled injector will take the time to assess your lips for volume required and underlying asymmetry before proceeding with treatment. They will clean the area with antiseptic to prevent infection before numbing the lips with a topical anesthetic. Once the lips are numb, ice is applied to help minimize swelling and discomfort.
Unlike Botox, dermal fillers do not paralyze muscles; they simply fill out skin depressions to reduce the appearance of lines and wrinkles. They use hyaluronic acid, a naturally occurring substance found in the body that is responsible for moisture retention. The hyaluronic acid in dermal fillers hydrates the lips, making them look soft and youthful.
Dermal fillers are often used in conjunction with a variety of other cosmetic treatments to achieve the best possible results. They can be used in the corners of the lips to elongate the shape, and to correct the philtral tubercle that makes it harder for the top lip to “flip” upward as it naturally does. They can also be injected under the eyes to smooth out fine lines and wrinkles.
The most experienced practitioners combine the various techniques discussed above to deliver optimal results. They have a mastery of the latest technologies and trends in the industry, so they can provide you with the best of both worlds – natural-looking results that beautify your lips while also addressing fine lines and wrinkles.
Lines and Wrinkles
When choosing a doctor for lip injections, it’s important to do your homework. Rather than relying on celebrity endorsements and advertisements, look for doctors who specialize in facial fillers and dermal filler treatments. They should also be board-certified or a member of their medical association. In addition, ask to see before-and-after photos of their work.
Hyaluronic acid fillers like Juvederm and Restylane can be used for both lip augmentation and reducing fine lines that develop around the mouth, also known as vertical lip lines. These lines are caused by contraction of the orbicularis oris muscle and can be corrected with anti-wrinkle injections before dermal fillers are added.
Reputable injectors know how to create a natural-looking lip shape, and they’ll work with you to determine the right amount of product you need. They can also tell if the skin is going to expand enough to accommodate additional filler, which is an important skill that comes from experience.
A reputable injector will also take the time to properly prepare your lips before the procedure, which includes numbing them and applying a cold compress or lip balm. They may even use a nerve block to fully numb the area before injecting.
In addition to avoiding a “done” look, proper preparation and care will help minimize side effects like bruising and lumps. Bruising is common in any injection treatment and is the result of small blood vessels being damaged during the procedure. To reduce the risk of bruising, it’s recommended that patients avoid consuming aspirin, ibuprofen, and other medications that can increase the likelihood of bleeding or clotting.
Lumps can be a sign of over-injection or of the wrong type of filler being used, and are usually treated with a dissolving enzyme such as hyaluronidase. They can also be caused by lip sagging or over-inflating from repeated injections, which is why it’s important to follow up with your doctor as soon as you notice the bumps, if they occur.
Lips are sensitive, and the injection process can feel like a sharp pinch. However, there are options that contain lidocaine, a common local anesthetic, to make the treatment more comfortable.
Safety
Lip injections are among the least invasive of all filler treatments, but they do come with some risks. As such, it’s important to follow your doctor’s post-treatment advice to prevent complications like bruising and lumps.
It’s also crucial to understand the limits of what lip injections can achieve. A new practitioner may get excited about enhancing the lips with dermal fillers, but you’ll want to be careful that you don’t overdo it, leading to an unnatural look that requires retreatment.
A good rule of thumb is to use no more than HA filler in your top and bottom lip combined. This will give your mouth a natural balance and not make it look overdone or disproportionate to the rest of your face. During your consultation, discuss the desired outcome and set realistic goals. A good injector will help you achieve these goals without risking the integrity of your facial structure or creating an undesirable result.
One way to reduce the chances of bruising after lip injections is to avoid touching or kissing your newly swollen lips. Not only will this cause discomfort, but it can disperse the filler, which could lead to unnatural results. Similarly, it’s best not to drink from a straw or smoke right after treatment, as these activities can force your lips into a shape that won’t go back to normal once the swelling subsides.
Another way to prevent bruising after lip injections is to start with a thinner product than you wish to begin with. Thicker products have a tendency to form lumps due to the extra pressure that is applied to the lips. As you gain experience, you’ll be able to determine which product is the best fit for your skin.
Lastly, you should always avoid injecting into the middle of your lips. This area tends to have more blood vessels and is more prone to vascular compression, which can lead to unwanted results. A reputable practitioner will assess the cupids bow in your lips and make sure that they’re not over-injected. They will then reassess the area after 15 days to see how it’s healing and if more volume is needed.